
眠るシーラカンスと水底のプログラマー
Winodws Phone, Windows, EC-CUBEの情報を発信します毎度のお約束、本記事はプレビュー状態のOS、IDE、SDKを利用しております。製品版では異なる可能性があります。
本記事はWindows 10向けのユニバーサルWindowsアプリについて学んだことを残して行く記事です。
これまでの記事はカテゴリ「UWP(Win 10) Preview」を参照ください。
地図アプリ
今回はMapControlSampleを紹介します。
プロジェクト名の通りBingMapを使ったアプリケーションの実装方法です。
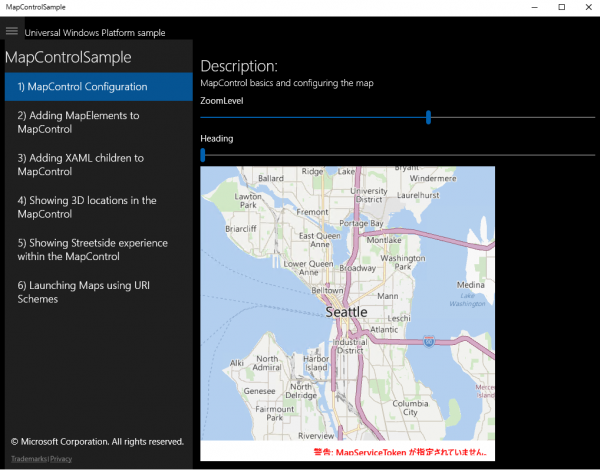
マップの設定
BingMapの表示にはMapControlを利用します。
<maps:MapControl x:Name="myMap"  Grid.Row="2"
                         ZoomLevel="{Binding ElementName=zoomSlider,Path=Value, Mode=TwoWay}"
                         Heading="{Binding ElementName=headingSlider,Path=Value, Mode=TwoWay}"
                         DesiredPitch="{Binding ElementName=desiredPitchSlider,Path=Value, Mode=TwoWay}"
                         HorizontalAlignment="Left"
                         />
サンプルはBingMapサービスを利用するためのキーを指定していないので、警告が表示されます。
警告:MapServiceTokenが指定されていません。
![]()
8、8.1時代のMapControlだとCredentialsプロパティにキーを指定していた気がしますが、UWPではMapServiceTokenプロパティに指定するようです(・・・ようですというのは、指定してみても警告が消えなかったからです)。
ZoomLevelなどのプロパティのいくつかは、Sliderコントロールと双方向バインディングされています。
表示形式は以下のように変更できます。
switch(styleCombobox.SelectedIndex)
{
    case 0:
        myMap.Style = MapStyle.None;
        break;
    case 1:
        myMap.Style = MapStyle.Road;
        break;
    case 2:
        myMap.Style = MapStyle.Aerial;
        break;
    case 3:
        myMap.Style = MapStyle.AerialWithRoads;
        break;
    case 4:
        myMap.Style = MapStyle.Terrain;
        break;
}
ピンを立てる
MapControlの特定の地点にピンを立てることができます。
サンプルでは画像ファイル、ポリゴン、ポリライン(線?)を指定しています。
private void mapIconAddButton_Click(object sender, Windows.UI.Xaml.RoutedEventArgs e)
{
    MapIcon mapIcon1 = new MapIcon();
    mapIcon1.Location = myMap.Center;
    mapIcon1.NormalizedAnchorPoint = new Point(0.5, 1.0);
    mapIcon1.Title = "My Friend";
    mapIcon1.Image = mapIconStreamReference;
    mapIcon1.ZIndex = 0;
    myMap.MapElements.Add(mapIcon1);

}

/// <summary>
/// This method will draw a blue rectangle around the center of the map
/// </summary>
private void mapPolygonAddButton_Click(object sender, Windows.UI.Xaml.RoutedEventArgs e)
{
    double centerLatitude = myMap.Center.Position.Latitude;
    double centerLongitude = myMap.Center.Position.Longitude;
    MapPolygon mapPolygon = new MapPolygon();
    mapPolygon.Path = new Geopath(new List<BasicGeoposition>() {
        new BasicGeoposition() {Latitude=centerLatitude+0.0005, Longitude=centerLongitude-0.001 },
        new BasicGeoposition() {Latitude=centerLatitude-0.0005, Longitude=centerLongitude-0.001 },
        new BasicGeoposition() {Latitude=centerLatitude-0.0005, Longitude=centerLongitude+0.001 },
        new BasicGeoposition() {Latitude=centerLatitude+0.0005, Longitude=centerLongitude+0.001 },

    });

    mapPolygon.ZIndex = 1;
    mapPolygon.FillColor = Colors.Red;
    mapPolygon.StrokeColor = Colors.Blue;
    mapPolygon.StrokeThickness = 3;
    mapPolygon.StrokeDashed = false;
    myMap.MapElements.Add(mapPolygon);
}

private void mapPolylineAddButton_Click(object sender, Windows.UI.Xaml.RoutedEventArgs e)
{
    double centerLatitude = myMap.Center.Position.Latitude;
    double centerLongitude = myMap.Center.Position.Longitude;
    MapPolyline mapPolyline = new MapPolyline();
    mapPolyline.Path = new Geopath(new List<BasicGeoposition>() {
        new BasicGeoposition() {Latitude=centerLatitude-0.0005, Longitude=centerLongitude-0.001 },
        new BasicGeoposition() {Latitude=centerLatitude+0.0005, Longitude=centerLongitude+0.001 },
    });

    mapPolyline.StrokeColor = Colors.Black;
    mapPolyline.StrokeThickness = 3;
    mapPolyline.StrokeDashed = true;
    myMap.MapElements.Add(mapPolyline);
}
XAMLの子要素を追加する
XAMLで子要素を追加できます。
<maps:MapControl x:Name="myMap" HorizontalAlignment="Left">
    <maps:MapItemsControl x:Name="MapItems">
        <maps:MapItemsControl.ItemTemplate>
            <DataTemplate>
                <Button  x:Name="mapItemButton" Click="mapItemButton_Click" Background="Transparent">
                    <StackPanel>
                        <Border Background="{ThemeResource ApplicationPageBackgroundThemeBrush}">
                            <TextBlock Text="{Binding DisplayName}"/>
                        </Border>
                        <Image Source="{Binding ImageSourceUri}"
                           maps:MapControl.Location="{Binding Location}"
                           >
                            <Image.Transitions>
                                <TransitionCollection>
                                    <EntranceThemeTransition/>
                                </TransitionCollection>
                            </Image.Transitions>
                        </Image>
                    </StackPanel>
                </Button>
            </DataTemplate>
        </maps:MapItemsControl.ItemTemplate>
    </maps:MapItemsControl>
</maps:MapControl>
データのリストはItemsSourceプロパティに以下のように指定しています。
MapItems.ItemsSource = poiManager.FetchPOIs(myMap.Center.Position);
poiManager.FetchPOIsはList<T>のデータを返します。ListBoxにデータの集合を渡すような感じですね。
3D表示する
マップを3D表示することができます。
            if (myMap.Is3DSupported)
            {
                this.myMap.Style = MapStyle.Aerial3DWithRoads;

                BasicGeoposition spaceNeedlePosition = new BasicGeoposition();
                spaceNeedlePosition.Latitude = 47.6204;
                spaceNeedlePosition.Longitude = -122.3491;

                Geopoint spaceNeedlePoint = new Geopoint(spaceNeedlePosition);

                MapScene spaceNeedleScene = MapScene.CreateFromLocationAndRadius(spaceNeedlePoint,
                                                                                    400, /* show this many meters around */
                                                                                    135, /* looking at it to the south east*/
                                                                                    60 /* degrees pitch */);

                await myMap.TrySetSceneAsync(spaceNeedleScene);
            }
ストリートビューを表示する
ストリートビューを表示できます。
Space Needleはシアトルにあるタワーの名前ですね。
if (myMap.IsStreetsideSupported)
{
    BasicGeoposition spaceNeedlePosition = new BasicGeoposition();
    spaceNeedlePosition.Latitude = 47.6204;
    spaceNeedlePosition.Longitude = -122.3491;

    Geopoint spaceNeedlePoint = new Geopoint(spaceNeedlePosition);

    StreetsidePanorama panoramaNearSpaceNeedle = await StreetsidePanorama.FindNearbyAsync(spaceNeedlePoint);

    if (panoramaNearSpaceNeedle != null)
    {
        myMap.CustomExperience = new StreetsideExperience(panoramaNearSpaceNeedle);
    }
}
URLスキームからマップアプリを起動する
URLスキームを利用してマップアプリを起動することができます。
Uri uri = new Uri("bingmaps:?rtp=adr.Mountain%20View,%20CA~adr.San%20Francisco,%20CA&mode=d&trfc=1");
var launcherOptions = new LauncherOptions();
launcherOptions.TargetApplicationPackageFamilyName = "Microsoft.WindowsMaps_8wekyb3d8bbwe";
await Launcher.LaunchUriAsync(uri, launcherOptions);
しばらく触らないうちにBingMapも色々なことができるようになっていてびっくり。
Please give us your valuable comment