
眠るシーラカンスと水底のプログラマー
Winodws Phone, Windows, EC-CUBEの情報を発信しますユニバーサルWindowsアプリ(Pre)入門013:カメラ操作2 顔認識
土曜日 , 27, 6月 2015 WinRT(UWP), UWP(Win 10) Preview Leave a comment毎度のお約束、本記事はプレビュー状態のOS、IDE、SDKを利用しております。製品版では異なる可能性があります。
本記事はWindows 10向けのユニバーサルWindowsアプリについて学んだことを残して行く記事です。
これまでの記事はカテゴリ「UWP(Win 10) Preview」を参照ください。
顔認識
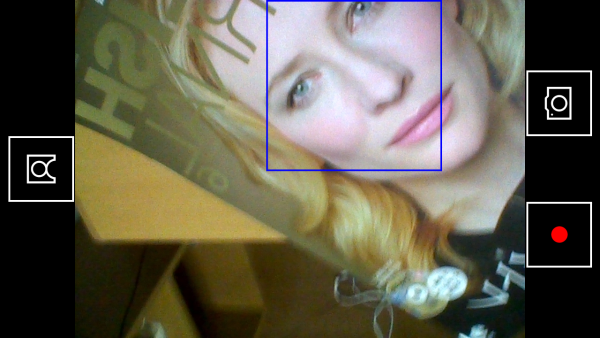
今回のサンプルはCameraFaceDetectionです。
こんな感じで、カメラのプレビュー映像から顔を判定します。
基本的なカメラの処理についてはユニバーサルWindowsアプリ(Pre)入門012:カメラ操作1を参照ください。
FaceDetectionEffectクラス
顔認識の設定をしているコードは以下。
// Create the definition, which will contain some initialization settings
var definition = new FaceDetectionEffectDefinition();

// To ensure preview smoothness, do not delay incoming samples
definition.SynchronousDetectionEnabled = false;

// In this scenario, choose detection speed over accuracy
definition.DetectionMode = FaceDetectionMode.HighPerformance;

// Add the effect to the preview stream
_faceDetectionEffect = (FaceDetectionEffect)await _mediaCapture.AddVideoEffectAsync(definition, MediaStreamType.VideoPreview);

// Register for face detection events
_faceDetectionEffect.FaceDetected += FaceDetectionEffect_FaceDetected;

// Choose the shortest interval between detection events
_faceDetectionEffect.DesiredDetectionInterval = TimeSpan.FromMilliseconds(33);

// Start detecting faces
_faceDetectionEffect.Enabled = true;
_faceDetectionEffect変数はFaceDetectionEffectクラウスのインスタンスを保持しています。
顔が検知されるとFaceDetectionEffect_FaceDetectedイベントハンドラ―が呼び出されます。
private async void FaceDetectionEffect_FaceDetected(FaceDetectionEffect sender, FaceDetectedEventArgs args)
{
    // Ask the UI thread to render the face bounding boxes
    await Dispatcher.RunAsync(CoreDispatcherPriority.Normal, () => HighlightDetectedFaces(args.ResultFrame.DetectedFaces));
}
FaceDetectedEventArgsに認識した顔の情報(複数)を保持しているので、サンプルではその情報をもとにRectangleを画面に表示しています。
こういうのが標準でできると開発が捗りそうですね。
Please give us your valuable comment