
眠るシーラカンスと水底のプログラマー
Winodws Phone, Windows, EC-CUBEの情報を発信しますユニバーサルWindowsアプリ(Pre)入門014:カメラ操作3 画像のキャプチャー・加工・保存
土曜日 , 27, 6月 2015 WinRT(UWP), UWP(Win 10) Preview Leave a comment毎度のお約束、本記事はプレビュー状態のOS、IDE、SDKを利用しております。製品版では異なる可能性があります。
本記事はWindows 10向けのユニバーサルWindowsアプリについて学んだことを残して行く記事です。
これまでの記事はカテゴリ「UWP(Win 10) Preview」を参照ください。
画像の加工
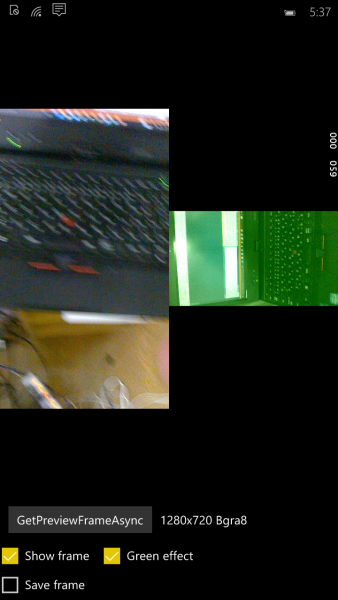
今回はCameraGetPreviewFrameサンプルを紹介します。
プロジェクト名から予想がつくようにカメラ画像からプレビュー画像を取得して加工や保存します。
Windows 8、8.1時代とはAPIが変わっていて、新しく覚えないといけない感じがします。
プレビュー画像の取得
カメラ映像から画像を取得するにはVideoFrameクラスを取得してSoftwareBitmapを取り出します。
var previewProperties = _mediaCapture.VideoDeviceController.GetMediaStreamProperties(MediaStreamType.VideoPreview) as VideoEncodingProperties;

// Create the video frame to request a SoftwareBitmap preview frame
var videoFrame = new VideoFrame(BitmapPixelFormat.Bgra8, (int)previewProperties.Width, (int)previewProperties.Height);

// Capture the preview frame
using (var currentFrame = await _mediaCapture.GetPreviewFrameAsync(videoFrame))
{
// Collect the resulting frame
SoftwareBitmap previewFrame = currentFrame.SoftwareBitmap;

// Show the frame information
FrameInfoTextBlock.Text = String.Format("{0}x{1} {2}", previewFrame.PixelWidth, previewFrame.PixelHeight, previewFrame.BitmapPixelFormat);

// Add a simple green filter effect to the SoftwareBitmap
if (GreenEffectCheckBox.IsChecked == true)
{
    ApplyGreenFilter(previewFrame);
}

// Show the frame (as is, no rotation is being applied)
if (ShowFrameCheckBox.IsChecked == true)
{
    // Create a SoftwareBitmapSource to display the SoftwareBitmap to the user
    var sbSource = new SoftwareBitmapSource();
    await sbSource.SetBitmapAsync(previewFrame);

    // Display it in the Image control
    PreviewFrameImage.Source = sbSource;
}

// Save the frame (as is, no rotation is being applied)
if (SaveFrameCheckBox.IsChecked == true)
{
    await SaveSoftwareBitmapAsync(previewFrame);
}
}
SoftwareBitmapをSoftwareBitmapSourceにセットして、ImageコントロールのSourceに指定しています。
うん見慣れない流れですね。
画像の加工・保存
サンプルでは画像を全体的に緑っぽい色に変換しています。
ちょっと長いですが、SoftwareBitmap型の変数bitmapからCreateReferenceメソッドでストリームを取り出して、それを加工するという流れです。
if (bitmap.BitmapPixelFormat == BitmapPixelFormat.Bgra8)
{
    // In BGRA8 format, each pixel is defined by 4 bytes
    const int BYTES_PER_PIXEL = 4;

    using (var buffer = bitmap.LockBuffer(BitmapBufferAccessMode.ReadWrite))
    using (var reference = buffer.CreateReference())
    {
        if (reference is IMemoryBufferByteAccess)
        {
            // Get a pointer to the pixel buffer
            byte* data;
            uint capacity;
            ((IMemoryBufferByteAccess)reference).GetBuffer(out data, out capacity);

            // Get information about the BitmapBuffer
            var desc = buffer.GetPlaneDescription(0);

            // Iterate over all pixels
            for (uint row = 0; row < desc.Height; row++)
            {
                for (uint col = 0; col < desc.Width; col++)
                {
                    // Index of the current pixel in the buffer (defined by the next 4 bytes, BGRA8)
                    var currPixel = desc.StartIndex + desc.Stride * row + BYTES_PER_PIXEL * col;

                    // Read the current pixel information into b,g,r channels (leave out alpha channel)
                    var b = data[currPixel + 0]; // Blue
                    var g = data[currPixel + 1]; // Green
                    var r = data[currPixel + 2]; // Red

                    // Boost the green channel, leave the other two untouched
                    data[currPixel + 0] = b;
                    data[currPixel + 1] = (byte)Math.Min(g + 80, 255);
                    data[currPixel + 2] = r;
                }
            }
        }
    }
保存処理はFileStorageクラスからこれまたストリームを取得して、BitmapEncoderクラスを用いて書きこみという流れです。
var file = await KnownFolders.PicturesLibrary.CreateFileAsync("PreviewFrame.jpg", CreationCollisionOption.GenerateUniqueName);
using (var outputStream = await file.OpenAsync(FileAccessMode.ReadWrite))
{
    var encoder = await BitmapEncoder.CreateAsync(BitmapEncoder.JpegEncoderId, outputStream);

    // Grab the data from the SoftwareBitmap
    encoder.SetSoftwareBitmap(bitmap);
    await encoder.FlushAsync();
}
新しいAPIが色々出てきましたが、やっていることがわかりやすいコードではありますね。
Please give us your valuable comment